If you’ve been using email for a while, you may have noticed fewer and fewer junk emails in your inbox. This is thanks to “spam protection”, which uses machine learning technology to automatically filter out junk emails, keeping our inboxes clean and tidy.
This is great, because spam is everywhere. In fact, a recent report found that as much as 90% of all emails sent are spam!
That’s why spam protection is essential. But sometimes it makes mistakes, sending the wrong thing to the spam folder (which, let’s be honest, nobody ever checks). That means you could be missing out on important emails without even knowing it.
That’s why your email provider has a “whitelist” function – it allows you to guarantee certain emails never get automatically filtered into the spam inbox, and it only takes about 30 seconds to do.
If you enjoy a particular email newsletter (like our Innovation Newsletter) or expect an important email from someone, we highly recommend using the “whitelist” function!
How to “whitelist” an email address
For most email providers, all you have to do is add the email to your contact list. However, some are slightly different. We’ll walk through a few of the most popular:
- Gmail
- Yahoo!
- Outlook
- Mac OS X Mail app
Note: If you’re using a different email provider, simply search “how to whitelist for [your client here]” and specific instructions should pop right up.
For most of these, we’ll use the Innovation Newsletter for our whitelist example. It’s a weekly curated newsletter packed with interesting content, how-to guides (like this one!) and even some exclusive discounts.
How to whitelist an email on Gmail
The easiest way to whitelist on Gmail is to add someone to your contacts.
When you receive an email from someone you want to whitelist, simply click on the three dots to the right of the email, then click “Add [name] to Contacts List”.
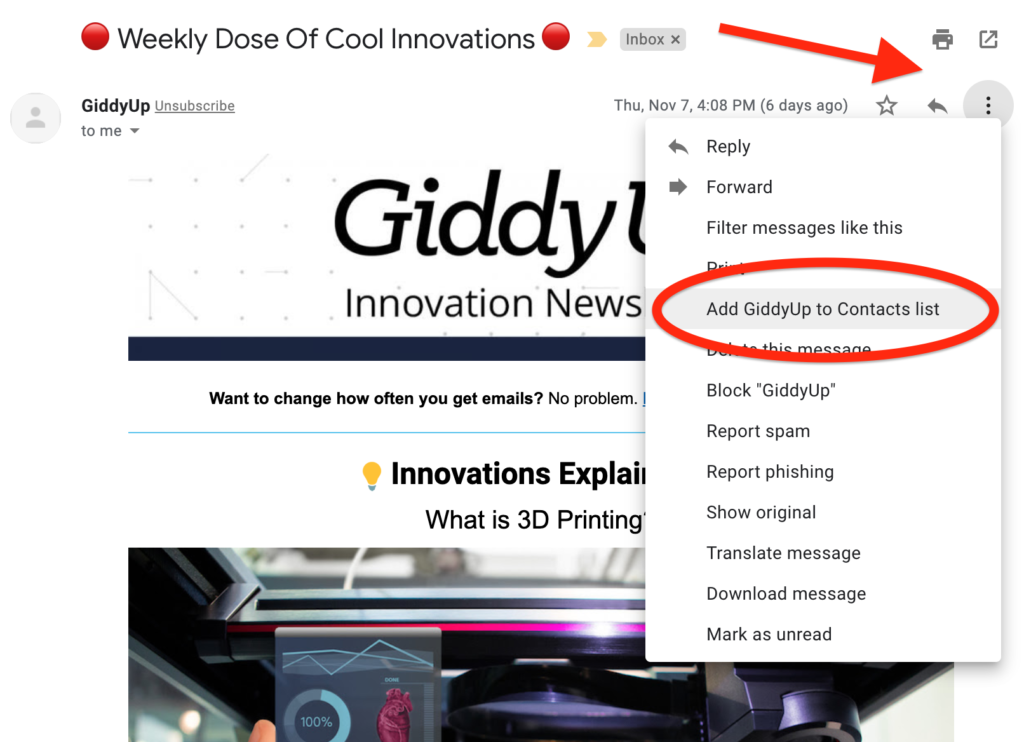
That’s it!
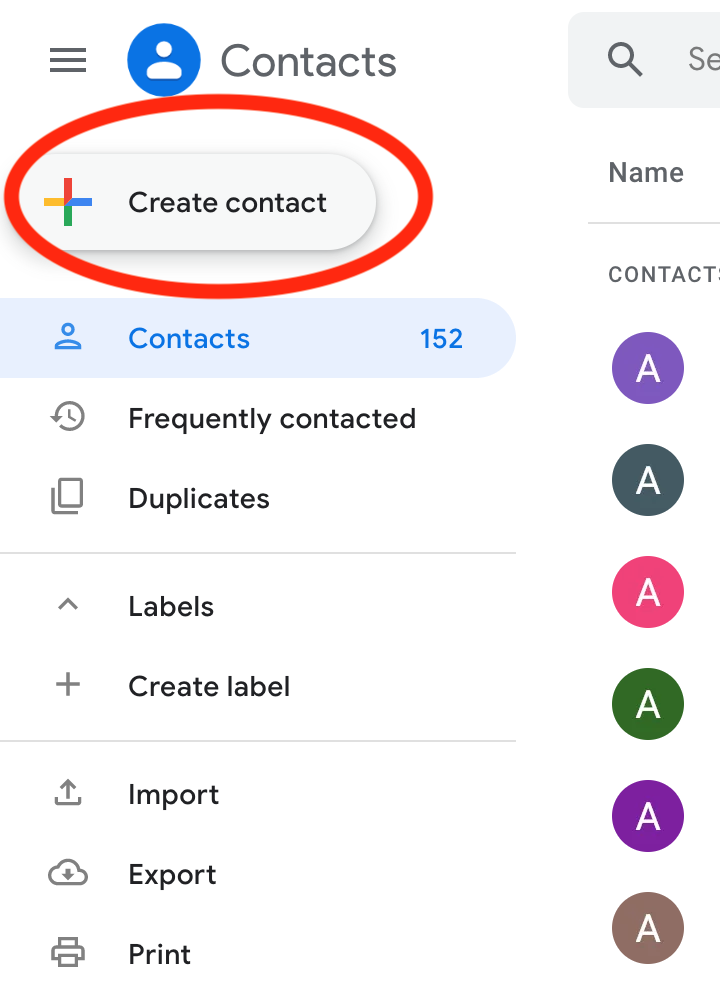
If you don’t already have an email from the person you want to whitelist, you can add it to your contacts manually:
1. Click on the grid in the top right corner and then click on “Contacts”.

2. Click “Create Contact”.
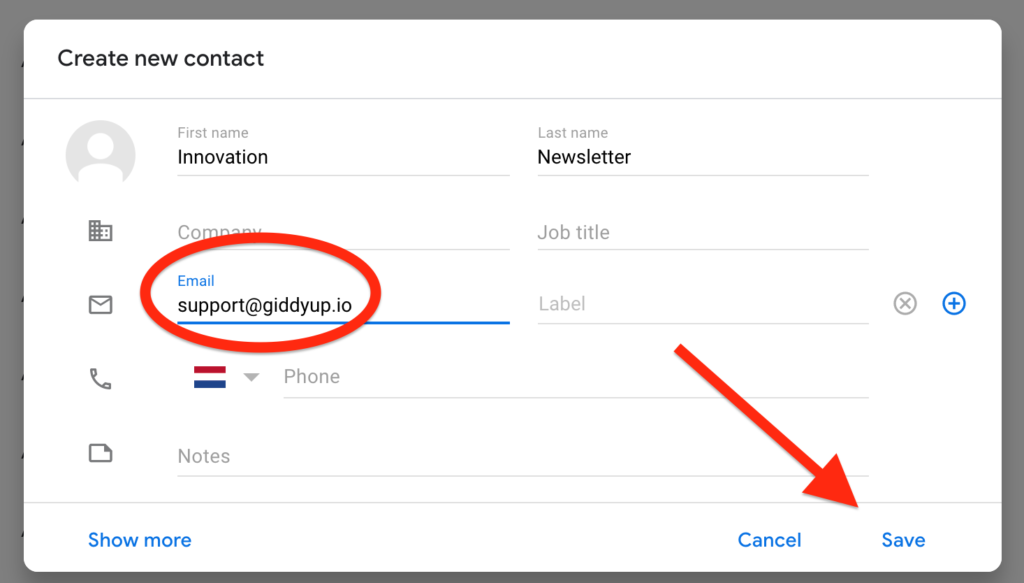
3. Add the email address (and other details if desired) and click “Save”.
How to whitelist an email on Outlook
Different versions of Outlook have various ways of doing this, but they are all similar.
If you already have an email from the address you’d like to whitelist, you can follow the same instructions as Gmail, but choosing “Add Sender to Safe Senders List” instead of contacts.
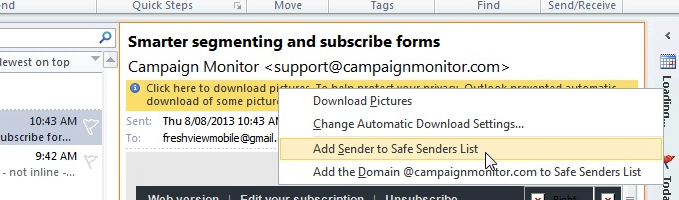
If you’re using Outlook.com, you may also get a small message at the top of an email. Click “Always show content” to ensure you see their emails in the future.

If you don’t have an email from the address you’d like to whitelist yet, you can proactively add someone to your Safe Sender list as well:
1. Go to the Home tab.
2. Click Junk > Junk Email Options.
3. Select the “Safe Senders” tab and click “Add”.
4. In the Add address or domain box, enter the email address or the domain name you want to whitelist.
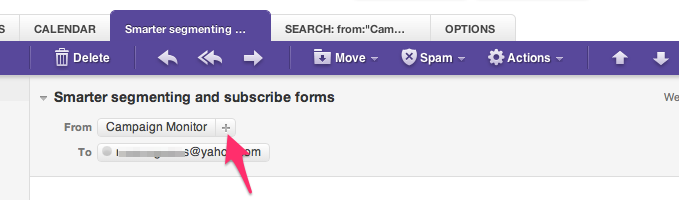
How to whitelist an email on Yahoo!
Like the others, you can either add emails to your whitelist directly from an email you’ve received from someone, or you can add an address to a filter.
If you already have an email from the address you’d like to whitelist, then simply click the “+” sign next to the address in the “From” field and choose “Add to contacts”.
If you haven’t already received an email from the address you’d like to whitelist, follow these instructions to do it in advance:
1. Mouse over the Settings menu icon and select Settings.
2. Click “Filters” and then “Add”.
3. Enter a Filter Name (such as “Whitelist”).
4. Type in the email you want to whitelist in the “Sender” field (for example, “support@giddyup.io” for the Innovation Newsletter)
5. Select Inbox as the folder to deliver the email to.
6. Click Save and then click Save again.
How to whitelist an email on the Mac OS X Mail app
Okay, this one is a bit trickier than the rest, but it’s still rather simple.
1. In the top menu, click Mail > Preferences.
2. Click the “Rules” tab.
3. Click “Add Rule”
4. Enter a name in the Description field, such as “Innovation Newsletter”.
5. For conditions, set the first dropdown menu item to “any”. It should say: “If any of the following conditions are met.”
6. In the dropdown menus, select “From” in the first field and “Ends with” in the second field.
7. In the text field following “Ends with”, enter the website of the email address, without the part before “@” (so to whitelist our newsletter, you’d add “giddyup.io” here).
8. In the “Perform the following actions” section below, set the two dropdown items to: “Move Message” and “Inbox”.
9. Click OK to save the rule.
If you need some visual help, here’s a GIF (replace “sumo.com” with your desired domain, like “giddyup.io”):

Conclusion: Whitelisting + spam filter = happy email inbox!
Since we would all go insane if we turned off our spam filters, using the whitelist or adding contacts is the best way to ensure you always get what you want in your inbox (and nothing else).
By the way… did you know that the term “spam” was inspired by a Monty Python sketch? It makes fun of the infamous meat product SPAM’s ubiquity, claiming it’s “everywhere” – just like the modern-day digital equivalent.